Summary
This is a library for the Arduino IDE that allows the polling of multiple ultrasonic distance sensors using the I2C bus and a single hardware interrupt pin. It assumes a PCF8574(A) type port expander to trigger the sensors, and tri-state buffers to multiplex the echo signals. It is specifically developed and maintained to support the author’s OctoSonar boards version 2.0+. For earlier boards see the SonarI2C library.
It has been developed for use with the HC-SR04 sensor – and has been tested with units from multiple manufacturers.
Supported Platforms
This library is designed to work with the Arduino IDE versions 1.6.x or later; it is not tested it with earlier versions. It should work with any Arduino compatible board with an available hardware interrupt pin. Note that other interrupt activity may interfere with the accuracy and reliability of this code.
Getting Started
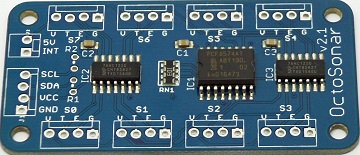
Hardware
This code supports the OctoSonar v2.0 and later. Schematics and board designs are included in this repo.
Boards and sensors can be purchased at on Tindie.
The board should be connected to your controller as follows:
- GND -> GND
- VCC -> VCC (5V on the UNO)
- SDA -> SDA (A4 in the UNO)
- SCL -> SCL (A5 on the UNO)
- INT -> a hardware interrupt pin (2 or 3 on the UNO)
- 5V -> a 5V supply (VCC on the UNO)
Note that the 5V supply drives the sensors and the VCC drives the electronics. This allows the unit to be supported on 3.3V controllers (some Arduino formats and Raspberry Pi, Teensy etc). You can save a wire on a 5V controller by connecting the 5V and VCC pins together via the V1 solder jumper.
As manufactured the board has an I2C address of 0x38. This can be altered via solder jumpers on the back.
The I2C bus requires pullup resistors on the SDA and SCL lines to VCC. While Arduinos will enable the internal pullups, these are too large at 20k – 50k for reliable operation of I2C. The generally recommended value to use is 4.7k. Positions are provided on the board at R1 and R2 to add these pullup resistors. On my projects I usually have several devices on the bus and place the pullups near the controller. For more information on use of the I2C bus there is an excellent Sparkfun tutorial.
Software
If you are using version 1.6.2 or later of the Arduino software (IDE), you can use the Library Manager to install this library:
- In the Arduino IDE, open the “Sketch” menu, select “Include Library”, then “Manage Libraries…”.
- Search for “OctoSonar”.
- Click the OctoSonar entry in the list.
- Click “Install”.
If this does not work, you can manually install the library:
- Download the latest release archive from GitHub and decompress it.
- Rename the folder “OctoSonar-master” to “OctoSonar”.
- Move the “OctoSonar” folder into the “libraries” directory inside your Arduino sketchbook directory. You can view your sketchbook location by opening the “File” menu and selecting “Preferences” in the Arduino IDE. If there is not already a “libraries” folder in that location, you should make the folder yourself.
- After installing the library, restart the Arduino IDE.
(note – the above instructions adapted from a Pololu readme)
Examples
An example is included showing the use of the OctoSonar with 8 sensors. It will display the 8 measurement on LCD and the serial monitor. It supports 1602 and 2004 LCDs.
Library reference
- Constructor. Call once outside loop() and setup(). This sets the I2C address of the pin expander (0x38 – 0x3F). e.g. OctoSonar() myOcto;
   OctoSonar(); // defaults constructor 0x38, 2
   OctoSonar(uint8_t address, uint8_t interrupt); // constructor
- call one of the begin() functions from setup(). The second one of these lets you set the active ports up front. e.g. myOcto.begin();
   void begin();
   void begin(uint8_t active);
- Disabling sensors that you are not interested in right now allows the other sensors to poll more often. This is a bitmask mapping to the 8 sensors on the unit. A ‘1’ is ‘active’. e.g. myOcto.active = 0x03; // S0 and S1 only
uint8_t active; // mask of active sensors
- by default we skip one out of range/failed echo, keeping the last value. It may be useful to raise this count in sub-optimal echo environments. This is a global setting. e.g. OctoSonar::maxOOR = 2;
static uint8_t maxOOR; // how many OOR to skip. Raise this in noisy environments
- by default the output is in mm. You can change this by setting this to OCTOSONAR_CM for cm, or OCTOSONAR_IN for inches. It is the value needed to convert from microseconds to the desired unit. This is a global setting. e.g. OctoSonar::units = OCTOSONAR_IN;
static double units; // defaults to OCTOSONAR_MM
- Call this every loop(). If it is time, it will poll the next enabled sensor. e.g. OctoSonar::doSonar();
static void doSonar();
- Return values. By default, when the sensor does not get a good echo a zero value is returned. Using the second form of read() allows you to set your own preference for what is returned. The returned value defaults to mm. e.g. int16_t distance = myOcto.read(1); // read distance from S1
   int16_t read(uint8_t sonar);
   int16_t read(uint8_t sonar, int16_t outOfRange);
Using multiple boards
The code is written to support multiple OctoSonar units on the same or different interrupt pins. It will cycle through all the active sensors on one board, then move on to the next board, in a loop. It will not poll multiple boards in parallel. At the time of writing (6/30/2017) I haven’t actually tested this multi-board capability. It uses similar logic to that used in the earlier SonarI2C library, except that it is the boards that are in a looped-linked-list not the sensors.